A weighted overlay service is an item in your ArcGIS organization that references an image service. The image service references a mosaic dataset. You can share the item with your organization, specific groups, or the public so that they can leverage your content in an analysis tool.
Note:
In ArcGIS Online, the Everyone (public) share option is unavailable for dynamic imagery.
A mosaic dataset is a file-based data storage mechanism. To allow others to use it in a server or cloud environment, publish it to your ArcGIS organization as a service.
Publish the service to ArcGIS Enterprise
Ensure you have ArcGIS Image Server and ArcGIS GIS Server with ArcGIS Spatial Analyst 11.0 for Server before completing the following steps. This is required to publish the mosaic dataset as a service with Enterprise. You must use Enterprise 10.3 or later.
- Create and configure a mosaic dataset to support a weighted overlay service.
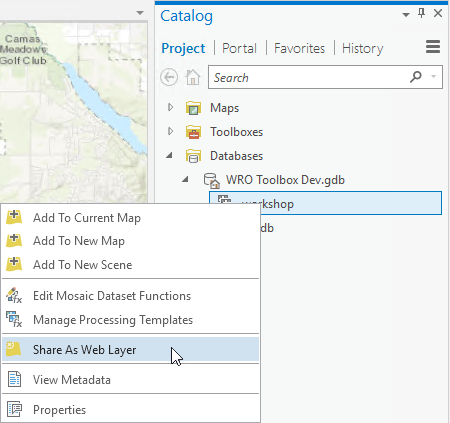
- In ArcGIS Pro, browse to the mosaic dataset you created, right–click the mosaic dataset, and click
Share As Web Layer
 .
.
- In the Share As Web Layer pane, provide a name in the Name text box.
- Provide a summary in the Summary text box.
- Type weightedOverlayService and any other descriptive tags for the web layer in the Tags text box.
If the weightedOverlayService tag is not included, the service will not appear as an option in ArcGIS GeoPlanner.
- Choose Reference registered data or Copy all data.
If you are using local and cloud data, choose Copy all data because this creates a copy of the dataset on ArcGIS Image Server.
When using Share As Web Layer to share web imagery layers to Enterprise, the default Layer Type option is Imagery. - Under Location, use the Folder menu to choose a folder in your portal content in which to store the web layer. Optionally, create a folder.
By default, the web layer is stored at the root level of your portal content.
Tip:
Click the Browse button
 to browse to a folder in your portal content. You can also type a folder name in the text box.
 - Use the Server and Folder drop-down menus to specify the federated server where the service will be published and the folder where it will be stored. Optionally, create a folder.
By default, the service is stored in the root folder of the server.
Note:
The Server and Folder options appear only if you are sharing to ArcGIS Enterprise using the Reference registered data option. In this case, you can also click the Data Stores button
 to open the Manage Registered Data Stores pane. Use this pane to register geodatabases and folders with federated servers.
 - Under Share with, specify how the web layer will be shared:
- Everyone—Share your content with the public. Anyone can access and see it.
- My Organization—Share your content with all authenticated users in the organization. This option is available when you are signed in with an organizational account.
- Groups—Share your content with groups to which you belong and their members.
Leave all options unchecked to set the sharing level to the owner of the item.
- Optionally, click the Content tab to see the folder structure and sublayers of the web layer.
- Under Finish Sharing, click Analyze
 to review for potential problems.
 Errors and warnings are listed on the Messages tab. Right-click a message to open its help topic or take corrective action in the software. Errors
 must be resolved before you can share your GIS resource. Resolving warnings
  is recommended but not required.
 - After you resolve errors, and optionally resolve warnings, click Publish
 to share the web layer.
Share the service using ArcGIS Online
Ensure you have ArcGIS Image for ArcGIS Online and ArcGIS Pro 2.9 or later before completing the following steps. This is required to share the mosaic dataset as a service with ArcGIS Online.
- Create and configure a mosaic dataset to support a weighted overlay service.
- In ArcGIS Pro, use the Command Search text box to search for the Create Hosted Imagery tool and open it.
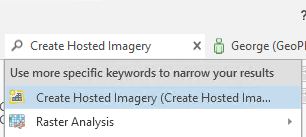
- In the Create Hosted Imagery tool, uncheck the Tiled Imagery Layer check box.
- Check the Dynamic Imagery Layer check box.
- Under Do you have a single image or a collection of images choose the Mosaic Dataset option and click Next.
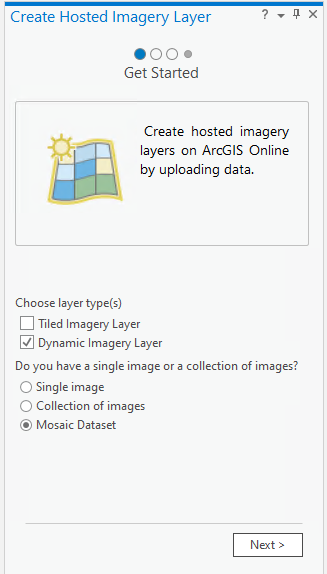
- For the Source Data text box, click Browse
 to specify the mosaic dataset you created.
Caution:
Ensure that there aren't any spaces in the path to the mosaic dataset. If you modify the path to remove spaces, you must also update the paths on the mosaic.
Tip:
You can use the Repair Mosaic Dataset dialog box to modify the path and remove spaces. Right-click the mosaic dataset in the Catalog pane, point to Modify, and click Repair Mosaic Dataset Paths.
- Click Next.
- Provide a name in the Name text box.
- Provide a description in the Description text box.
- Type weightedOverlayService and any other descriptive tags for the web layer in the Tags text box.
- Specify a folder or create one for the published data in the Folder drop-down text box and click Next.
- Click Run.
The service is shared to your ArcGIS Online organization.
Note:
You can modify the sharing options for the published image service from its item details page in your ArcGIS organization.
Publish the service to ArcGIS Image Dedicated
Ensure that you have access to Image Dedicated and the corresponding cloud environment.
- Create and configure a mosaic dataset to support a weighted overlay service.
- In ArcGIS Pro, ensure that you are signed in to your ArcGIS organization with access to your Image Dedicated instance.
- In the Catalog pane, ensure that you have the Image Dedicated toolbox added.
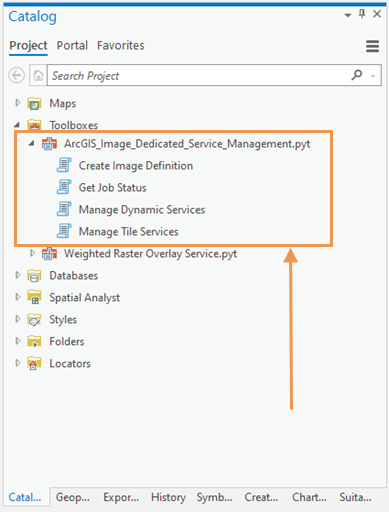
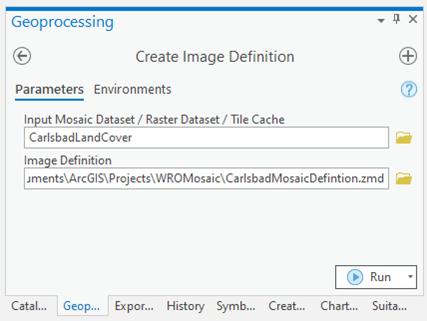
- Click Create Image Definition in the toolbox to run the tool.
This tool creates image definitions of raster datasets and mosaic datasets that will be used to publish dynamic image services to a dynamic imagery server.
- For the Input Mosaic Dataset / Raster Dataset / Tile Cache parameter, specify the mosaic you want to publish for the weighted raster overlay tool.
- For the Image Definition parameter, provide a name and location for your image definition.
- Click Run.
The output of this tool is a .zmd file that contains the image definition.
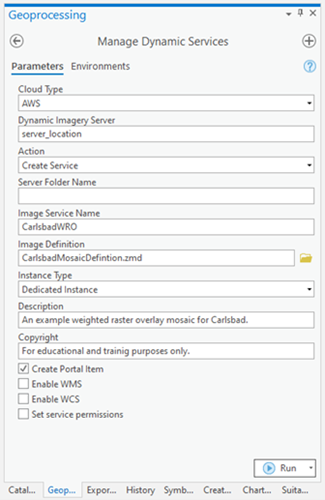
- Click Manage Dynamic Services.
This tool publishes the mosaic dataset as a dynamic image service. It can also be used for management by updating, starting, stopping, and deleting the service.
- In the Cloud Type parameter, specify the cloud type where the image will be deployed.
- In the Dynamic Image Server parameter, choose the server alias where the image will be deployed.
- In the Action parameter, leave the default value of Create Service.
This creates a new image service. Other values for this parameter allow you to manage existing services.
- Optionally, provide an existing folder name or type a new name to create a folder for the service in the Server Folder Name parameter.
- Name your new service in the Image Service Name parameter.
- In the Image Definition parameter, browse to the .zmd file you created.
- In the Instance Type parameter, specify whether the instance is dedicated or shared using the drop-down arrow.
- Provide additional details about the service in the Description and Copyright parameters.
- Check the Create Portal Item check box to ensure that an item is created in your ArcGIS organization.
- Click Run.
The service is published to your Image Dedicated instance and an item is created in your ArcGIS organization. You can find the service URL in your ArcGIS Pro geoprocessing results or referenced in the item in your ArcGIS organization.
You have created and shared a weighted overlay service. You can access this service in ArcGIS Web AppBuilder, ArcGIS Experience Builder, or GeoPlanner.